Medical Foundations 1
Chapter 4Vital Signs and Introduction to Patient-Centred Physical Exams
Part 1: Approach to Patient-Centred Physical Exams
Core Principles123
- Privacy: Exam should be conducted in a space with appropriate privacy, allowing the patient to disrobe and dress as required with available gowns and drapes.
- Consent: Explain what exam is being proposed, why it is being proposed and ask for consent to allow clinician to proceed. The patient is in control – they can pause or stop an exam at any time. Remember that consent is an ongoing process – be in constant communication and ask for permission for every step of the exam.
- Non-Verbal Communication: Speak clearly and calmly, appear engaged, maintain eye contact, sit/stand at eye level, avoid sudden movements, and be mindful of patient cues (e.g. tensing muscles, fidgeting, breathing quickly, appearing distracted, crying) – patient cues are important opportunity to check-in with patient in an open, non-judgmental way.
- Third-Party Attendance at Intimate Examinations (See CPSO Policy – Boundary Violations)4:
- Example Third Party – Support Person (e.g. friend, family): There to support patient.
- Example Third Party – Chaperone (e.g. nurse, preceptor): There to support patient and for medico-legal protection.
- Physicians must give patients the option of having a third-party present during an intimate examination, including bringing their own third party if the physician does not have one.
- If patient wants a third-party present but no one available or no agreement on who the third party should be, physicians must give option to delay or reschedule the exam or refer to another physician if exam not urgently needed or explain risks of delaying exam if urgently needed.
- If physician requests a third party be present (e.g. chaperone), the physician must explain who the third party is to the patient. If the patient declines, physicians must consider whether to proceed with the exam based on best interests of the patient, including whether the exam is urgently needed.
Before Exam
Introduce Yourself and Wash Hands
- Knock on door and ask for permission to enter the clinical interview space (respecting privacy)
- Share your name and role in patient care (if not already done earlier during the assessment)
- Example: My name is X, and I am a medical student working with Dr. Z in the clinic today.
- Wash hands: Recall the 4 moments of hand hygiene:
- (1) before initial patient/patient environment contact (e.g. use hand sanitizer while walking into room)
- (2) before aseptic procedure (if applicable)
- (3) after body fluid exposure risk (if applicable)
- (4) after patient/patient environment contact
Patient Introduction
- Ask the patient how they would like to be addressed. Reflect their name and pronouns during the visit.
- Example 1: How would you like to be addressed?1
- Example 2: What would you like to be called today?
- Example follow-up question: If you feel comfortable, could you share what pronouns you use?
- Note: Not all patients, including trans and non-binary patients, may be comfortable sharing their pronouns. If the patient is uncomfortable when asked their pronouns, clarify your goal is to ask patients’ pronouns routinely to create a welcoming space. Be accepting if the patient declines to share pronouns.
- Tip: If you make a mistake, apologize, use the correct pronouns, and move on. Example: “The patient reports he – I’m sorry I used the wrong pronoun. The patient reports she is experiencing dyspnea.”
Set An Agenda
- Explain what exam is being proposed and why. Ask for consent to allow clinician to proceed.
- Example: “I’d like to transition to the physical exam. We will be doing a pulmonary exam today, so I will be listening to the lungs. This exam should take about 5 minutes. How does that sound to you?”
Make it Standard
- Example: “This is something we do with all of our patients who come in with symptoms of shortness of breath.”
Identify Concerns
- Example: “What questions do you have before the exam?”
Ask About Comfort
- Example: “Is there anything we can do to make you more comfortable during the exam? Please tell me if you feel uncomfortable or want to stop or pause the exam. You are in control of what we do here today.”
Offer Support Person
- Example: “Would you like anyone else to be present for the exam?”
- Example – Support Person (e.g. friend, family): There to support patient.
- Example – Chaperone (e.g. nurse, preceptor): There to support patient and for medico-legal protection.
- See above re. CPSO Policy on Third-Party Attendance at Intimate Examinations. Helpful practice to offer a support person for each physical exam. This is aligned with principles of trauma-informed care (e.g. safety – remember that safety is defined by those we serve).
Patient Terms
- Ask patients about the terms they would like used for their anatomy (e.g. terms to describe their genitals or chest, if pertinent for the exam being performed) and then use those terms during the assessment.
During Exam
Approach to Draping56
- Helpful Video on Draping - Proper Adjustment of Patient Attire during the Physical Exam (JoVE Science Education video, available at: https://library.mcmaster.ca/databases/jove-science-education).
- If the patient has limited mobility, ask if they would like assistance in changing into a gown. Clinicians should not provide this assistance unless the patient requires and requests assistance.
- Provide instructions on what to do with the gown (what the patient wears) and drape (sheet covering their person), including that it be kept open at the back, and what clothing can be removed or left on.
- For a limited exam, consider asking patient to move their clothing rather than disrobing (e.g. patient lifts back of shirt up to reveal low back skin lesion).
- Leave the patient’s room or use curtains and screens to allow the patient to undress and gown up privately. Check that curtains adequately block visibility.
- Let them know when you’ll return (e.g. in 5 minutes).
- Knock and ask patient if OK to come back into the exam room space.
- Communicate to the patient about what is about to be done before moving a gown or drape. Check-in – remember that consent is an ongoing process.
- Don’t reach under a gown, drape or clothing to examine a patient.
- Enlist the patient’s help in moving the gown or drape throughout the exam, as this allows the patient to maintain some control over the degree of exposure. Only assist patients with the adjustment or removal of clothing or draping if the patient agrees or requests the physician to do so.
- Do not assume patients with male gender expression are comfortable baring a full chest.
- Only expose the area of the body being directly examined. When you complete the examination of an exposed area, replace the gown or drape.
- Limit the exposure times for sensitive areas (e.g., anterior chest, inguinal region) but do not compromise the exam to do this.
- If you have untied the gown during the exam, retie it before asking patient to step down from the table.
Introduce Components, Explain Why
- Example: “I am now going to listen to the lungs, using my stethoscope. This is important because we need to see if you have pneumonia, which is a lung infection.”
Ask Permission
Allowing the patient to be in control wherever possible.
- Example: “May I open the gown from the back slightly, to get a better listen to the lungs?”
Respect Personal Space
- Be mindful of your position in clinical space relative to the patient and the door – context dependent.
- Why this is context dependent: For example, in managing a patient with agitation, for safety of healthcare providers we remember “never let the patient get between you and the door.” This same approach could be traumatizing in other scenarios e.g. when performing sensitive examinations, a trauma-informed approach would be to ensure the patient has clear access to the door in exam rooms and can easily exit if choosing to do so.
- Stay with eyesight, positioned to gather physical exam data, and also giving patient sense of ease and control (e.g. “I’m going to stand at your side.”)
Use Professional Touch
- Prepare patients for different sensations (e.g. “this is a tuning fork that will feel like a vibration”; “the speculum may feel cold”; “you’re going to feel my hand on the abdomen”)
- Use gloves: Particularly important when performing sensitive exams.
Use Simple, Clinical Language
- Key Idea: Word choice is professional, not personal; easy to understand; cautious with imagery; avoiding any possible sexual connotation. Use patient language for their anatomy.
- Refer to anatomy as “the” instead of “your” to make your language more clinical and professional, less personal (e.g. “the breast” vs. “your breast”)
- Refer to equipment in clinical terms e.g. “exam table” vs. “bed”
- Refer to passive physical exam tests in clinical terms e.g. “examine” vs. “feel”, “inspect” vs. “look at”
- Refer to physical exam tests requiring patient action in terms of the action itself e.g. “resist this motion” vs. “don’t let me”
- Avoid phrases which enhance power differential e.g. “I’m going to place my hands on the neck to examine the thyroid. When you can, please swallow” vs. “swallow for me” – Avoid phrase “for me”
- Use non-normative terminology e.g. “healthy” vs. “normal”
Check-In and Monitor for Signs of Discomfort
- Check-In: “How are you doing?”
- Watch for discomfort or distress (e.g. tensing muscles, fidgeting, breathing quickly, appearing distracted, crying) and stop the exam immediately if the patient is in distress: Check-in in an open, non-judgmental way, and let the patient know they are in control.
After Exam
Approach to Draping
- Allow the patient to dress before finishing the appointment: Leave the room so patient can dress. Return and review when they say they are ready.
Express Thanks
- Example: “Thanks very much for coming to this appointment and for helping me perform a thorough physical exam.”
Discuss Results
- Note – as you learn new clinical skills, you may not be at a developmental stage to interpret findings in terms of pathophysiology or generate a differential diagnosis. It is helpful to skip this step in these cases (e.g. to defer until after reviewing with your preceptor).
- Example: “The lungs sound clear which is good. You do not need a chest x-ray, and don’t have pneumonia.”
Provide opportunity for questions
- Do not leave the patient with unanswered questions – even if findings on exam are “normal”. As you learn new clinical skills, you may not be at a developmental stage to answer all patient questions. In these cases, it is helpful to acknowledge the question and that you will ask your preceptor.
- Example: “What questions do you have?”
Make a Plan for Follow-Up
- As a medical student, the next step may be for you to step out to review with your preceptor, then come back to discuss next steps.
Wash Hands
Wash hands: Recall the 4 moments of hand hygiene: (1) before initial patient/patient environment contact (e.g. use hand sanitizer while walking into room) → (2) before aseptic procedure (if applicable) → (3) after body fluid exposure risk (if applicable) → (4) after patient/patient environment contact
Part 2: Focused History – Based on Chief Complaint (Begin with Open-Ended Questions)
HPI
Focused History Before Vitals Assessment
- Have you had any caffeine or cigarettes in the last 30 mins? Have you done any vigorous exercise in the last hour? Have you taken any medications today?
- Have you had any surgeries in either arm? Any recent stress? History of white coat syndrome (change in blood pressure due to presence of healthcare professional)?
- Ensure patient has been seated at rest for at least 5 minutes before vitals assessment
- Modification for patients who are deconditioned: Ensure patient seated for 15 mins prior to measuring vitals, otherwise values (e.g. BP, HR) may be falsely elevated with mild exertion (applies to all patients regardless of body habitus)
Patient-Centred Weight Discussion7
- Sample Questions to Begin Conversation with Adults about Weight:
- Would it be alright if we discussed your weight?
- Are you concerned about your weight?
- Would you be interested in addressing your weight at this time?
- Adult Weight Hx (If Patient gives Permission to Discuss):
- Onset: Weight during childhood and adolescence
- History of Patterns and Triggers of Weight Gain (e.g. life events – marriage, job, pregnancy, trauma, menopause, etc.)
- History of Patterns of Weight Loss: Previous attempts, strategies
- Current Patterns: Eating, exercise, sleep, stress and time management
- Readiness Ruler: Assessing patient’s current self-assessment for behavior change, on a scale of 1-10 for importance, readiness, confidence, and confidence with supports. (See Appendix 1)
- Barriers: Explore barriers to weight loss, factors contributing to weight gain.
Part 3: Pertinent Notes About the Physical Exam
Vitals
Waist Circum, Waist-Height Ratio, Waist-Hip Ratio and BMI - Adult
AFMC level Pre-clerkship 4 · Clerkship 4
Say: Would it be alright if we measure your height, weight, hip circumference and waist circumference today?
Set-Up: Ask permission before weighing someone, and never weigh a patient in front of others. Weighing scales should be placed in private areas in clinical spaces.
Do:
- Ask patient to remove shoes.
- Requires a weight scale, a method of measuring height, and a tape measure.
- Measure the patient’s weight and height using appropriate scales.
- For waist circumference, measure circumference at a level midway between the Iliac Crest and last palpable rib (WHO guidelines)
- For hip circumference, measure at the level with the widest portion of the buttocks.
- Using these measurements, calculate BMI (kg /m²), Waist-Height Ratio, and Waist-Hip Ratio.
Report: The height and weight we measured today were _____, with a BMI of ______.
Why Check: Waist-Height Ratio and Waist-Hip ratio are objective measures of central (abdominal) obesity associated with ↑ cardiovascular risk. These calculated measures, including BMI, are imperfect, but clinically useful to monitor individual patients over time. Differential diagnoses for weight changes include Nutritional state, malignancy, chronic illness, eating disorders, hyper/hypothyroidism, hyper/hypo-cortisolism, etc.
WHO Classification of Weight Status:
| Weight Status | Under-Weight | Normal Range | Overweight | Class I Obesity | Class II Obesity | Class III Obesity |
|---|---|---|---|---|---|---|
| BMI (kg/m²) | < 18.5 | 18.5 – 24.9 | 25 – 29.9 | 30 – 34.9 | 35 – 39.9 | ≥ 40 |
Edmonton Obesity Staging System (EOSS)10: Staging according to obesity-related risk factors, physical symptoms, psychological symptoms, and functional impairment. Overall stage determined by highest component (e.g. pt with Stage 3 Physical Symptoms, Stage 1 otherwise is considered EOSS Stage 3 Overall)
| EOSS Stage | Obesity-Related Risk Factors | Physical Symptoms | Psychological Symptoms | Functional Impairment |
|---|---|---|---|---|
| Stage 0 | None | None | None | None |
| Stage 1 | Subclinical Risk Factors (Borderline Hypertension, Impaired fasting glucose, elevated liver enzymes) | Mild Not Requiring Medical Intervention (e.g. moderate exertional dyspnea; occasional aches/pains; fatigue) | Mild | Mild (Quality of Life not impacted) |
| Stage 2 | Obesity-Related Comorbidities Requiring Medical Intervention (HTN, T2DM, OSA, PCOS, OA, GERD) | Obesity-Related Comorbidities Requiring Medical Intervention (HTN, T2DM, OSA, PCOS, OA, GERD) | Moderate (e.g. Depression, Eating D/O, Anxiety D/O) | Moderate (QoL beginning to be impacted) |
| Stage 3 | Significant Obesity-Related End-Organ Damage (MI, HF, Diabetes Complications, Incapacitating OA) | Significant Obesity-Related End-Organ Damage (MI, HF, Diabetes Complications, Incapacitating OA) | Significant (e.g. Major Depression, Suicidal Ideation) | Significant (QoL significantly impacted) |
| Stage 4 | Severe (Potentially End-Stage) Obesity-Related End-Organ Damage | Severe (Potentially End-Stage) Obesity-Related End-Organ Damage | Severe disabling symptoms | Severe limitations |
Modification for Patients with Limited Mobility:
- Height: Can be measured using the demi-span (distance from mid-sternal notch to the end of the middle finger in the coronal plane) and then calculated with the following formulas:
- For female patients: Height (cm) = (1.35 x Demi-span) + 60.1
- For male patients: Height (cm) = (1.40 x Demi-span) + 57.8
- Weight: The patient’s estimate of their own weight is more accurate than the physician’s. If the patient is unable to give an estimation, body weight can be estimated using body height, and hip and waist circumference.
Modification for Patients who are Transgender:
- Transmasculine Patients (FTM): Patients on masculinizing hormone therapy may have body fat redistribution and/or increased muscle mass.
- Transfeminine Patients (MTF): Patients on feminizing hormone therapy may have body fat redistribution and/or decreased muscle pass.
Heart Rate (HR) & Respiratory Rate (RR) (measure together)
AFMC level Pre-clerkship 4 · Clerkship 4
Say: I will now measure the heart rate.
Do:
- Find patient’s radial pulse by palpation, have watch handy.
- Measure HR first 15-30s (or full minute if irregular), pretend to continue, in last 15-30s, watch RR.
- When patients know they are being observed for Resp rate, you can get altered RR values as patient adjusts in response to being observed. To avoid this, measure RR while you’re measuring HR
Report: The heart rate we measured today is __ bpm, and respiratory rate we measured is __ breaths/minute. If you can please lie down on the exam table, I will measure the heart rate again in this position.
What Is Normal HR? 60-100 bpm (trained athletes can run physiologic bradycardia; peds physiologically ↑)
What is Normal RR? 12 -20 breaths/minute (peds physiologically higher)
What does Supine Tachycardia tell you? Specific for volume loss
Modification for Patients with Obesity: Use a handheld Doppler Ultrasound to locate pulses if they are difficult to feel by palpation. In this population, a handheld doppler may be more sensitive than palpation.
Blood Pressure (BP)
AFMC level Pre-clerkship 4 · Clerkship 4
Say: I will now measure the blood pressure.
Do:
- Patient sitting quietly and relaxed, feet uncrossed and flat on ground, ideally after resting 5 minutes before measurement.
- Elevate patient’s arm to level of heart – either use table/pillows, or support patient’s arm with one arm.
- Make sure you’re using the right cuff size (see figure)
- Position cuff 2-3cm above the crease of the elbow, with the “Artery” marker line aligned with brachial pulse.
- Palpate the radial pulse.
- While palpating the radial pulse, inflate cuff to 70 mmHg, then by 10 mmHg increments until pulse disappears – this is estimate of systolic blood pressure (SBP).
- Place your stethoscope under cuff at brachial artery. Inflate the cuff above estimate (+30 mmHg), slowly let out (2 mmHg/second) until first sound comes back (SBP). Continue to deflate cuff until you hear last sounds in series (Diastolic Blood Pressure – DBP). These are called Korotkoff sounds. Keep deflating slowly for another 10 mmHg to make sure these sounds don’t appear and disappear again, then rapidly drop the pressure all the way to zero. May remeasure after 2 mins to get average readings.
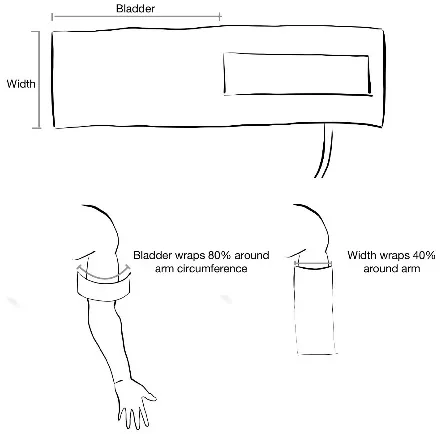
Report: The blood pressure in the right arm was (SBP/DBP) mmHg. I will now measure blood pressure in the other arm and check for signs of hypertensive end-organ damage (eyes, heart, peripheral vascular, kidneys).
What is Normal: 120/80. The method described above is Office Blood Pressure Measurement (OBPM) – a BP measurement with a healthcare provider in the room. While this is a foundational clinical skill particularly in settings where automated BP measurement devices are not available, these in-office measurements may be artificially elevated (whitecoat hypertension) or decreased (masked hypertension). In clinical practice, recommended methods for measuring Blood Pressures include11:
- In-Office (e.g. clinic): Recommend Automated Office Blood Pressure (AOBP) – automated device takes 3-6 measurements without patient unattended in private room.
- Alternative In-Office method: Office Blood Pressure Measurement (OBPM – described above)
- Out-Of-Office (e.g. in community): Recommend Ambulatory Blood Pressure Monitoring (ABPM) – automated device patient wears for 24-hour period with measurements taken at 20-30 minute intervals.
- Alternative Out-Of-Office method: Home Blood Pressure Monitoring (HBPM) – patient self-monitors and measures BP twice for each morning and evening at home (i.e. 4 measurements/day) for 7 days.
Why Check:
- Hypertension Diagnosis: Students encouraged to read CHEP Guidelines2 to learn more.
- In-Office Measurement: Mean Office BP ≥ 180/110 = diagnosis of HTN
- AOBP: BP ≥ 135/85 = probable HTN (need out-of-office measurement to confirm)
- OBPM with Diabetes: BP ≥ 130/80 for ≥ 3 measurements on different days = probable HTN (consider out-of-office measurement to confirm)
- OBPM without Diabetes: BP ≥ 140/90 = probable HTN (need out-of-office measurement to confirm)
- Out-Of-Office Measurement (rules out white-coat hypertension):
- ABPM: Daytime mean ≥ 135/85 or 24-hour mean ≥ 130/80 = diagnosis of HTN
- HBPM: Series mean ≥ 135/85
- In-Office Measurement: Mean Office BP ≥ 180/110 = diagnosis of HTN
- Hypotension: Systolic BP < 90 mmHg associated with increased mortality in ICU patients; Systolic BP < 80 associated with increased mortality in patients with Myocardial Infarction.
- Gestational Hypertension (pregnancy): BP >140/90 mmHg onset post-20 weeks gestation
- Preeclampsia (pregnancy): BP >140/90 mmHg onset post-20 weeks gestation + proteinuria on urinalysis or other end-organ dysfunction (e.g. liver, kidney)
- Aortic Dissection or Subclavian Steal: Measure BP in both arms → >20mmHg difference between arms
- Coarctation of Aorta: Measure BP in both arms and legs → hypertensive in arms and hypotensive in legs
Modification for Patients with Obesity: Ensure the blood pressure cuff is the appropriate size. If the BP cuff is too small, the reading will be falsely elevated.
Orthostatic Vitals
AFMC level Pre-clerkship 3 · Clerkship 4
(Also: Peripheral Vascular Exam – Ch.8; and Volume Status Exam – Ch. 9 – MF2)
Say: I will now measure the blood pressure and heart rate when standing up. Before starting, do you feel dizzy?
Do:
- Ensure you have the patient’s supine measurements for BP and HR
- Have patient stand with back facing exam table for safety in case they experience syncope with standing.
- Wait 1 minute then measure HR, then after an additional 1 minute, measure BP
Report: The blood pressure and heart rate changes are reassuring with no evidence of orthostatic hypotension.
What is Normal: HR ↑ 10, SBP ↓ 5, DBP ↓3.5
Why Check: Orthostatic hypotension occurs due to changes in venous return with standing, in combination with insufficient counter-regulatory mechanisms (e.g. volume depletion; autonomic dysfunction or medication adverse effects causing lack of appropriate reflex tachycardia or vasoconstriction responses). Orthostatic hypotension is a common cause of pre-syncopal symptoms and falls in elderly patients.
Threshold for Orthostatic Hypotension = 30-20-10 rule: 30 HR ↑; 20 SBP ↓; 10 DBP ↓ - or if patient becomes dizzy. HR ↑ 30 is most sensitive sign of orthostatic hypotension.
Notes:
- Keep in mind dizziness could be due to inner ear vertigo, ask whether common for patient. See Chapter 7 – Head and Neck Exam – MF1 for more information about dizziness.
- 30-20-10 rule doesn’t work as well for elderly patients due to Autonomic Nervous System’s ↓ Agility.
Modification for Patients with Obesity: see above tips for Blood Pressure and Heart Rate
Oxygen Saturation (O2 Sat, SaO2)
AFMC level Pre-clerkship 4 · Clerkship 4
Say: I will now be measuring the oxygen levels using a pulse oximeter.
Do:
- Place the pulse oximeter on a digit on the opposite hand from the blood pressure cuff (can give erroneous readings if blood pressure cuff inflated).
- Place pulse oximeter on a digit free of nail polish if possible (can give falsely low readings).
- Monitor waveform (synchronized with heart rate), wait for oxygen saturation readouts.
- If waveform is poor, the result may be unreliable – switch to a different digit
Report: The oxygen saturations measured today are 98%, which is normal.
Why Check: Pulse oximetry is a rapid, non-invasive tool to clinically detect hypoxemia, by measuring peripheral arterial oxygen saturation (SpO2) as a surrogate marker for tissue arterial oxygenation (SaO2). SaO2 indicates the degree of O2 saturation of hemoglobin (a percentage value) and is not impacted by hemoglobin concentration.
What is Normal? Normal → >96%; Patients who are CO2 Retainers → 88-92%
- About CO2 Retainer Mechanism: Some patients (e.g. with COPD, OSA, obesity) retain CO2 chronically (initially detected on arterial/venous blood gases) where their “normal” O2 saturation is lower (88-92%). There are three hypotheses describing why their SaO2 is kept between 88-92%:
- Hypoxic drive to breathe hypothesis: In healthy individuals, CO2 provides the drive to breath rather than O2. However, CO2 retainers are desensitized to CO2 and depend on O2 saturation for their drive to breath. Saturating them >92% decreases their hypoxic drive to breathe.
- Haldane effect hypothesis: Deoxygenated hemoglobin binds CO2 with greater affinity than oxygenated hemoglobin (Haldane effect). Thus, saturating >92% increases oxygen and shifts the CO2 dissociation curve to the right, offloading more CO2 and increasing PaCO2.
- V/Q mismatch hypothesis: In COPD patients for example, ventilation and gas exchange is optimized by hypoxic vasoconstriction, in an attempt to resolve the existing V/Q mismatch. Saturating >92% reduces hypoxic vasoconstriction and leads to more shunting of deoxygenated blood.
Exceptions in SaO2: SaO2 can be misleading in cases of carboxyhemoglobinemia (CO poisoning) or methemoglobinemia (Fe³⁺ heme iron instead of normal Fe²⁺) as hemoglobin appears occupied and saturated with typical O2 saturation probes.
Temperature
AFMC level Pre-clerkship 4 · Clerkship 4
Rectal, Tympanic, Oral, Axillary – depends on equipment availability and patient preference
What is Normal: Normal temperature value depends on method of measurement, as follows:
| Method | Rectal (gold standard) | Oral | Tympanic | Axillary |
|---|---|---|---|---|
| Normal (°C) | 36.6-38 | 35.5-37.5 | 35.8-38 | 36.5-37.5 |
Part 4: Relevant Likelihood Ratios – from Rational Clinical Examination JAMA Series
Clinical Question 1: What is the potential clinical significance of Tachycardia?12
| Procedure | LR+ (95% CI) | LR- (95% CI) |
|---|---|---|
| Pontine Hemorrhage – Predicting Mortality (HR > 110) | 25.4 (1.6-395.3) (about +45%) | 0.3 (0.2-0.6) (about −30%) |
| Gallstone Pancreatitis – Predicting Mortality (HR >100) | 6.8 (3.7-12.5) (about +30%) | 0.2 (0-1.0) (no change: 95% CI includes 1) |
| Myocardial Infarction – Predicting Mortality (HR >100) | 3.0 (2.3-4.0) (about +15%) | 1.0 (0.9-1.0) (no change: 95% CI includes 1) |
| Pneumonia – Predicting Mortality (HR >100) | 2.1 (1.1-3.8) (about +15%) | 0.7 (0.5-1.0) (no change: 95% CI includes 1) |
| Septic Shock – Predicting Mortality (HR >95) | 2.0 (1.3-3.3) (about +15%) | 0.1 (0-0.5) (about −45%) |
| Trauma & Hypotension – Predicting Mortality (HR >90) | 1.5 (1.4-1.7) (about +15%) | 0.2 (0.1-0.5) (about −30%) |
Clinical Question 2: What is the potential clinical significance of Tachypnea?12
| Procedure | LR+ (95% CI) | LR- (95% CI) |
|---|---|---|
| RR >24/min, predicting failure of weaning from ventilator (intubated patients) | 2.9 (1.2-7.1) (about +15%) | 0.1 (0-1.4) (no change: 95% CI includes 1) |
| RR >27/min, predicting cardiopulmonary arrest (medical inpatients) | 3.1 (1.9-5.1) (about +15%) | 0.6 (0.4-0.7) (about −15%) |
| RR >28/min, detecting pneumonia (outpatient with cough & fever) | 2.0 (1.4-2.8) (about +15%) | 0.8 (0.7-0.9) (about −15%) |
| RR >30/min, predicting mortality in pneumonia (medical inpatients) | 2.1 (1.7-2.6) (about +15%) | 0.6 (0.5-0.8) (about −15%) |
Clinical Question 3: Does this patient have a fever?12
| Procedure | LR+ (95% CI) | LR- (95% CI) |
|---|---|---|
| Patient’s Report of Fever | 2.9 (1.1-8.0) (about +15%) | 0.3 (0.2-0.5) (about −30%) |
| Patient’s Forehead Abnormally Warm | 2.9 (2.5-3.5) (about +15%) | 0.3 (0.1-0.6) (about −30%) |
Clinical Question 4: What is the potential clinical significance of patient Temperature?12
| Procedure | LR+ (95% CI) | LR- (95% CI) |
|---|---|---|
| Temperature >39C, Predicting Mortality in Pontine Hemorrhage (medical inpatients) | 23.7 (1.5-371) (about +45%) | 0.4 (0.2-0.6) (about −30%) |
| Temperature <35.2C, Predicting Death in Heart Failure (medical inpatients) | 6.7 (2.7-16.9) (about +30%) | 0.7 (0.5-1.0) (no change: 95% CI includes 1) |
| Temperature <36.1C, Predicting Death in Pneumonia (medical inpatients) | 3.5 (1.1-10.9) (about +15%) | 0.8 (0.5-1.2) (no change: 95% CI includes 1) |
| Temperature <36.5C, Predicting Death in Bacteremia (medical inpatients) | 3.3 (1.1-10) (about +15%) | 0.9 (0.8-1.0) (no change: 95% CI includes 1) |
Clinical Question 5: What is the potential clinical significance of Hypotension?12
| Procedure | LR+ (95% CI) | LR- (95% CI) |
|---|---|---|
| Myocardial Infarction (Acute) – Predicting Mortality | 15.5 (12.2-19.6) (about +45%) | 0.7 (0.7-0.7) (about −15%) |
| Pneumonia – Predicting Mortality | 10.0 (5.6-17.6) (about +45%) | 0.8 (0.7-1.0) (no change: 95% CI includes 1) |
| Bacteremia – Predicting Mortality | 4.9 (4.2-5.7) (about +15%) | 0.6 (0.2-1.4) (no change: 95% CI includes 1) |
| ICU – Predicting Mortality | 4.0 (3.6-4.3) (about +15%) | 0.8 (0.8-0.9) (about −15%) |
Clinical Question 6: Does this patient with Fever have Bacteremia?12
| Procedure | LR+ (95% CI) | LR- (95% CI) |
|---|---|---|
| Renal Failure | 4.6 (2.6-8.1) (about +15%) | 0.8 (0.7-0.9) (about −15%) |
| Poor Functional Performance | 3.6 (2.2-5.9) (about +15%) | 0.6 (0.4-0.8) (about −15%) |
| Hospitalization for Trauma | 3.0 (2.4-3.8) (about +15%) | 0.7 (0.3-1.3) (no change: 95% CI includes 1) |
| IV Drug Use | 2.9 (1.1-7.3) (about +15%) | 1.0 (0.9-1.0) (no change: 95% CI includes 1) |
| Previous Stroke | 2.8 (1.2-6.2) (about +15%) | 0.9 (0.8-1.0) (no change: 95% CI includes 1) |
| Rapidly Fatal Disease (<1mo) | 2.7 (1.4-5.2) (about +15%) | 0.9 (0.9-1.0) (no change: 95% CI includes 1) |
| Hypotension | 2.6 (1.6-4.4) (about +15%) | 0.9 (0.9-1.0) (no change: 95% CI includes 1) |
| Bands >1500 | 2.6 (1.3-5.1) (about +15%) | 0.7 (0.6-0.9) (about −15%) |
| Indwelling Urinary Catheter Present | 2.4 (1.2-4.7) (about +15%) | 0.8 (0.7-1.0) (no change: 95% CI includes 1) |
| Central IV Line Present | 2.0 (1.4-2.8) (about +15%) | 0.9 (0.8-1.0) (no change: 95% CI includes 1) |
| Shaking Chills | 1.8 (1.6-2.1) (about +15%) | 0.8 (0.7-0.9) (about −15%) |
| Acute Abdomen | 1.7 (1.3-2.3) (about +15%) | 1.0 (0.9-1.0) (no change: 95% CI includes 1) |
| WBC >15000 | 1.6 (1.2-2.2) (about +15%) | 0.8 (0.8-0.9) (about −15%) |
| Confusion or Depressed Sensorium | 1.5 (1.3-1.8) (about +15%) | 0.9 (0.8-1.0) (no change: 95% CI includes 1) |
| Diabetes Mellitus | 1.5 (1.1-2.1) (about +15%) | 0.9 (0.9-1.0) (no change: 95% CI includes 1) |
| Age 50+ | 1.4 (1.2-1.6) (about +15%) | 0.3 (0.1-0.8) (about −30%) |
| Tachycardia | 1.2 (1.1-1.4) (about +15%) | 0.7 (0.6-0.9) (about −15%) |
| Temperature >38.5C | 1.2 (1.1-1.3) (about +15%) | 0.5 (0.2-1.0) (no change: 95% CI includes 1) |
| RR > 20/min | 0.9 (0.8-1.1) (no change: 95% CI includes 1) | 1.2 (0.8-1.7) (no change: 95% CI includes 1) |
References
-
Elisseou S, Puranam MN. A novel, trauma-informed physical examination curriculum for first-year medical students. MedEdPORTAL. 2019;15:10799. ↩ ↩2
-
National Clinical Training Center for Family Planning. Clinician Guide for Trauma-Informed Care. 2022. ↩ ↩2
-
Canadian Public Health Association. Trauma-Informed Physical Examinations and STBBI Testing: A Guide for Service Providers. 2021. ↩
-
Boundary Violations. College of Physicians and Surgeons of Ontario. Accessed November 27, 2023. https://www.cpso.on.ca/Physicians/Policies-Guidance/Policies/Boundary-Violations ↩
-
A sensitive deliberate approach to draping. CPSO Dialogue. Accessed November 8, 2023. https://dialogue.cpso.on.ca/2019/10/a-sensitive-deliberate-approach-to-draping/ ↩
-
Conducting sensitive exams. CPSO Dialogue. Accessed November 8, 2023. https://dialogue.cpso.on.ca/2022/03/conducting-sensitive-exams/ ↩
-
Canadian Obesity Network. 5As of Obesity Management. 2011. www.obesitynetwork.ca ↩ ↩2
-
Kirk S, et al. Canadian Adult Obesity Clinical Practice Guidelines: Reducing Weight Bias in Obesity Management, Practice and Policy. 2020. ↩
-
Wharton S, et al. Obesity in adults: a clinical practice guideline. CMAJ. 2020;192:E875-91. ↩
-
Edmonton obesity staging system staging tool. drsharma.ca. Accessed March 13, 2019. http://www.drsharma.ca/wp-content/uploads/edmonton-obesity-staging-system-staging-tool.pdf ↩
-
Hypertension Canada. Accessed March 22, 2022. https://hypertension.ca/wp-content/uploads/2020/10/2020-22-HT-Guidelines-E-WEB_v3b.pdf ↩
-
McGee S. Evidence Based Physical Diagnosis. Saunders; 2012:810-811. ↩ ↩2 ↩3 ↩4 ↩5 ↩6